HowTo: Start an Amazon EC2 Instance
This HowTo will instruct you how to successfully launch and interact with your first Amazon EC2 Instance. There are screen shots to follow along with.
There’s a few things you need to successfully start a new Amazon EC2 instance (Elastic Compute Cloud.) If you don’t know what a Cloud server is: review here. The requirements to follow along with this HowTo are as follows:
- Browser that supports Javascript (Google Chrome or Firefox, for instance)
- An Amazon EC2 account
- An SSH client. (Linux has a built-in called ssh, Windows users may want to try PuTTY)
Once you have that set up, follow the guide below step by step. (All images can be clicked to expand to full size if they’re too small)
First, log in to the AWS Management console, and select the EC2 tab:

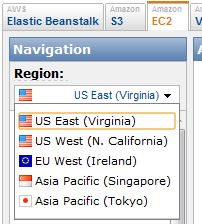
Take a moment to familiarize yourself with the layout of this window: all management functions are on the left. It shows what region your server will be in (Virginia is currently the cheapest region to have a server in), and you can change that by clicking on “US East (Virginia)”:
Below that you’ll see the INSTANCES section, which is where we’re heading next. Click the button labeled “Launch Instances.” **A new window will pop up with a list of **Quick Start Instance types, which we’re going to use the top one. Click “Select” here:

The next page will display, showing you the first page Instance Details, you shouldn’t need to make any changes here, for now, but take a moment to remember the layout for the future. Click “Continue.”

Advanced Instance Options settings now appear. Once again, you don’t need to make any changes in this window. Click “Continue.”

The final Instance Details page will display. This page allows you to set variables that the instance can see. You don’t need to add or change anything here, either. Click “Continue.”

Now we come to the Create Key Pair section. This is an important step, and you should take care to remember where you save your file in the following steps. First, you want to click the radio button titled “Create a new Key Pair” and enter a name for your new Key Pair. You can name it whatever you like, like “First KeyPair”:

Once you click “Create & Download your Key Pair” it will work for a few seconds and then immediately download the Key Pair. On my computer, it saves to the default location (my Downloads folder):

You should now be looking at the Configure Firewall page. You want to click the radio button titled “Create a new Security Group” here, and name it whatever you like, such as “First Security Group.” You can put a short description in the “Group Description” box, here we’ll put “Web and SSH”:

There is still more to edit in this window, if we want to be able to use this server! Next to Create a new rule there is a dropdown that says “Custom TCP rule”, go ahead and drop this down and select HTTP:

You’ll notice that Source: is “0.0.0.0/0”; this just means that any computer can access these ports. This seems like a security risk, but as this is the first EC2 Instance we’re making, it will be fine. In a future post we will explain how to properly set this value for maximum security. In addition, SSH access requires your Key Pair (that we made a few steps back) rather than a password, so for all intents and purposes, it’s unusable by anyone but yourself. Go ahead and click “Add Rule”:

Do the same for SSH:

Verify that your settings are correct and hit Continue. (remember that you can click any image to see it larger!):

With that warning out of the way, let’s review our information and get ready to launch our new instance:

Now you will see that your instance is launching, and you want to click the “View your instances on the Instances page” link:

On the Instances page, you should see information similar to this, after you click your new instance once:

The running status means that the instance is now available to log in to, and I’ve highlighted (and censor barred) the relevant section in the details that you need to know to connect to your new instance, namely the Public DNS. Don’t close this window just yet, you need this address!
On Linux, you connect to that IP address with ssh, for more information (and the exact connection string) you can right click on your instance and select “Connect”
On Windows, it’s slightly more involved, but not very difficult. You want to start a program called “PuTTYgen”, the PuTTY Key Generator. This will convert the Key Pair we downloaded earlier to the proper file type for PuTTY to use. After loading PuTTYgen, click “Load” and navigate to your downloaded .pem file (mine was named FirstKeyPair.pem). Be aware that you have to select “All files” in order to see the .pem file, it defaults to .ppk, which isn’t what we have:

After you click “Open” and “OK” on the following dialog, you should see a screen to the following; you want to click “Save Private Key”; it will say that you haven’t set a passphrase, just dismiss the dialog by clicking “Yes”. Save your file with the proper extension (“.ppk”) someplace that you can remember:

Go ahead and close PuTTYgen and open PuTTY. You will see a screen like the following; You want to enter your instances “Public DNS:” in the “Host Name (or IP)” section, and set a name for your new connection under “Saved Sessions”:

You now want to go on the left side of the window, and get to Auth, which is under Connections -> SSH -> Auth. You want to click “Browse”, navigate to your .ppk file that you saved with PuTTYgen:

Now, finally, go back to Session at the very top of the left side, and 1) click “Save” and then 2) click “Open”:

After clicking Open a window will pop up saying that a new key fingerprint has been discovered, with about a paragraph of warnings. You want to click “Yes” to both save the server’s half of the Key Pair and to continue to log in. The user name by default is “ec2-user” **and since we’re using **Key Pairs there is no password. Observe:

And that’s it! You’re now “On The Cloud”!
You can use your Instance now, or to shut it down from within SSH type “sudo shutdown -h now”