HowTo: Software Routers on Virtual Machines
Note: this guide explains how to set up a software virtual machine router on a windows computer, to replace an off the shelf linksys/dlink/belkin router you may have on your network.
This solution will completely replace your current router with one that is more powerful, more secure, and easier to maintain (via hard drive snapshots, etc.)
My last guide was such a huge success that I still get email about it twice a month… so i have decided to update the guide to a more generic look at how to software firewall in a virtual machine, and more specific questions can be answered in the thread’s replies.
The purpose of this guide is to help complete laymen get a software firewall up that provides more security and ease of use than an off-the-shelf solution from a big box store - and to help those who have already set one of these up but have more specific needs than a simple INTERNET -> HOME NETWORK sort of network.
First, I’ve switched to Open Source software, but these instructions work (known!) on VMWare workstation, microsoft virtualPC (don’t use it though), VirtualBox, and any linux flavor that allows bridging of NIC devices to virtual NIC devices (Xen, Amazon Elastic Compute Cloud, qemu, etc.)
The prior how-to still works for VMWare workstation, player, and server, and the hard part about using VMWare is setting up the network manager. So please refer to the 5th paragraph of that link to set up network manager in VMWare.
Secondly, the screenshots provided in this guide are VirtualBox, a free solution provided by Oracle (nee Sun) at virtualbox.org The reasons for using this solution over others will be covered after the guide.
Third note: the software firewall solution used in this guide is IPCop, although I have personally used and tested this with IPCop, pfSense, m0n0wall, SmoothWall, Freesco, and many others. please see en.wikipedia.org/
So let’s begin!
- Download and install your preferred virtual machine software.
- Load it up:

- Create a new virtual machine by clicking the blue starburst.
- after reading, click “Next”
- you’re going to want to name your VM something like “Firewall” or “IPCop”; Then pick Linux as the OS, and Linux 2.6 as the version. (for pfsense, monowall, and any other BSD system, use OS of BSD and FREEBSD, NetBSD, or OpenBSD as the version, depending on what the software is based on.):

-
your base memory size is dependent on two factors: how much memory your host machine has, and how much the minimum/actual requirements for the software firewall is. IPCop can happily churn away for months with 64MB of ram, whereas pfSense wants 128MB for basic tasks, and 256MB for a full blown corporate proxying firewall. Adjust as needed, and always double the minimum required ram if you can afford to.
- Decide how much hard drive space you’re going to need. Once again, this is dependent on two factors: How much you have to spare, and how much you think the firewall is going to use. If you’re going to want to speed up web browsing, you want to enable SQUID (a web proxy) inside your firewall, and you’re going to need lots of space (relatively!) compared to if you just want the security features only. For IPCop with proxy enabled, I recommend at least 8GB of space for logs, web cache, and system software. If you’re not sure, 8GB is a good place to start. If you’re sure you do not need a proxy (see the followup posts for more info) then 512MB to 2048MB will completely suffice for about a year’s worth of household internet security logs. (pfSense loves HDD space when used as a proxy. if you don’t use one, expect a really tiny install. i am currently using 4% of 16GB on my install)
- select Boot Hard Disk, and “Create new Hard Disk” and click next. A new wizard will pop up to guide you through setting up the virtual drive. “Dynamically Expanding Storage” is the best bet for all but the most high throughput SOHO networks, as the cache files will eventually fragment on the host machine. So if you’re doing this for your business that relies on fast internet searches, pick fixed size storage.

- Press finish to go back to the VM creation wizard, and review your settings. Mine shows IPCop settings here:

- Press finish, and highlight the new virtual machine you created; then click the Gold Cog “Settings” button:
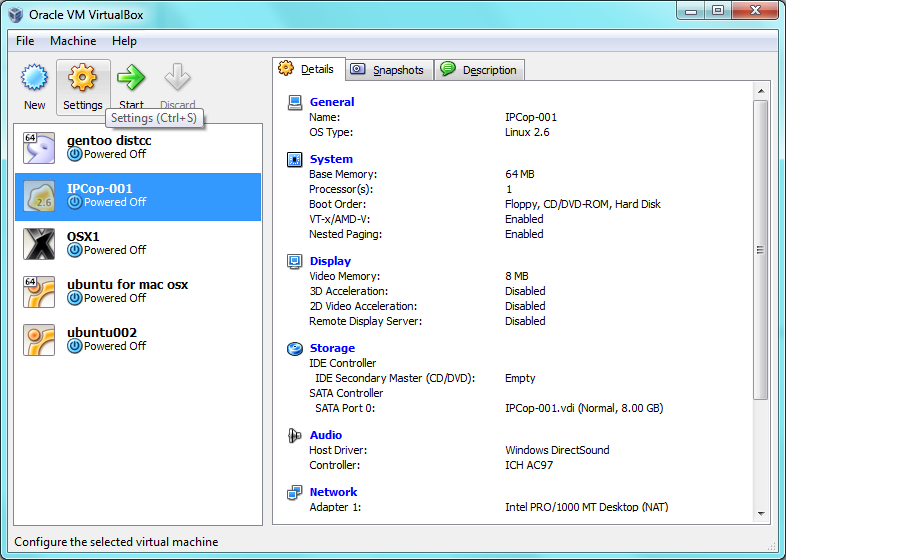
- Click the “System” tab on the left, to bring up the three pages of System settings, and make sure they reflect these images!


The PAE/NX setting dramatically increases virtual machine performance. When you start the VM, if it complains, both this setting, and the two on the next page may need to be turned off. to get the machine to boot. It is possible on all modern machines for all three to be enabled, occasionally requiring a BIOS firmware update of the host machine. email me if you run in to this problem and we may be able to work it out!

the settings on this page and the prior page allow your software firewall to run as though it were installed directly to the host machine, rather than running like an “emulator” - when used properly, there’s only a 2-10% overhead on virtual machines these days, mostly from HDD bottlenecks.
- Click on the storage tab, pick the CD-ROM icon under the IDE controller, and click the folder with the green ^ :

Click the “Add” button and navigate to the disc image (ISO) of whatever software firewall you are going to use to add it to VirtualBox as a volume:

And click “Select.”
- Additionally, select the SATA controller, and remove it (delete or hit the red minus symbol after selecting it). You then need to click the IDE Controller, and click the stack of discs with a green + to add another drive. On the right side, select the hard drive image you named/created earlier:

if you forget this step or do it improperly, IPCop will not boot, as it does not understand SATA correctly

- Next, select the network tab and select “Bridged Networking” under adapter 1 tab:

- Select the network card on your computer that is connected to your ISP device (dsl, cable modem, etc):

Note the Intel Pro Desktop selection for adapter type on this adapter. (for pfSense, uncheck the “cable connected” box)
- for adapter 2’s tab, select the NIC that is connected to the rest of your network (switch, wireless access point, hub, another router’s switch ports - not the WAN port!) - and select “PC-NET FAST III” as the adapter type:

(pfSense: uncheck “Cable Connected” box.)
Selecting different adapter types allows you to easily choose the right one while installing IPCop or other software.
- Go ahead and open your host machine’s network configuration screen. i do this by right clicking network neighborhood and selecting “properties”; or you can do it inside the control panel as well. right click your RED interface NIC (the one going to your DSL modem/cable etc) and select properties. UNCHECK ALL the stuff in there EXCEPT the VM bridge protocol. Or Virtualbox bridged networking driver, or whatever the driver is called for your virtual machine’s software.:

- I repeat, uncheck EVERYTHING. including TCP/IP. this prevents your host machine from using that NIC for anything. Hit OK, and then open the properties for your LAN/GREEN interface. In there, you’re going to want to go down to TCP/IP, click the properties button. Select the “use the following” radio button, and put in these values (assuming you used the IP i gave you before): IP ADDRESS: 192.168.0.10 SUBNET: 255.255.255.0 GATEWAY: 192.168.0.1
Primary DNS:192.168.0.1 SecondaryDNS: (this varies, i use 4.2.2.2, call your ISP and ask, or just use Verizon’s/Google’s for now.)
go ahead and hit OK to that, and close the properties window and the network connections window.
in the USB tab, uncheck “Enable USB Controller” and hit “OK” to save all of your settings. If it complains that you have a HID device enabled in the system settings, click that tab, and uncheck “use absolute pointing device” and then hit “OK”
The directions here diverge depending on what firewall you want to use. For BSD installations, it will ask you to connect a cable to your WAN adapter, just enable that cable by right clicking the little network icon on the virtual machine panel on the bottom right, selecting adapter 1, and selecting “connect cable” - then press enter in the virtual machine and it should detect it. repeat for adapter 2 and the LAN interface)
- once you are sure your settings are correct, click the Green “Start” arrow and off you go:

- read the prompts and begin to set up your new software install. For IPCop, follow the on screen installer until you see this screen:
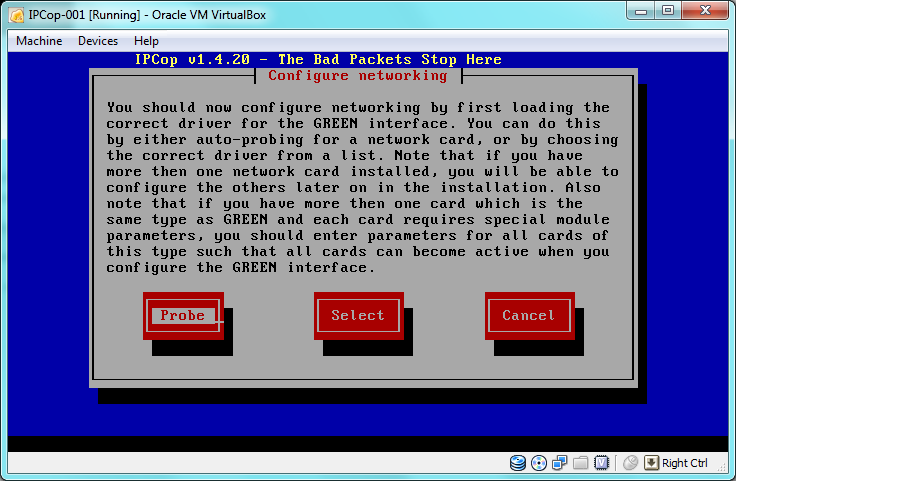
- select “Probe” and you should see this:

For those curious, it does the search alphabetically by driver name, hence setting adapter 2 to the AMD in the settings for the green interface!
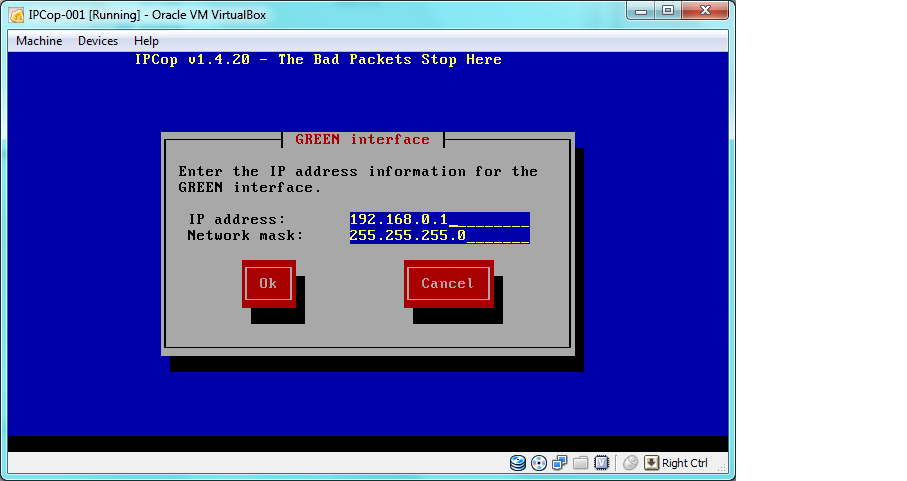
- select OK. if you are new to ipcop/routers in general, apply these settings: 192.168.0.1 for the IP, and 255.255.255.0 for the subnet mask. advanced users should tailor this to their specific needs:
-
click OK. now IPCop is going to tell a little lie, it says that you are done. Ignore the wall of text and just hit OK on the “Congratulations” screen. Continue setting up IPCop, until you get to the ISDN screen. make sure you select “Disable ISDN”
-
You should arrive at the network configuration window:
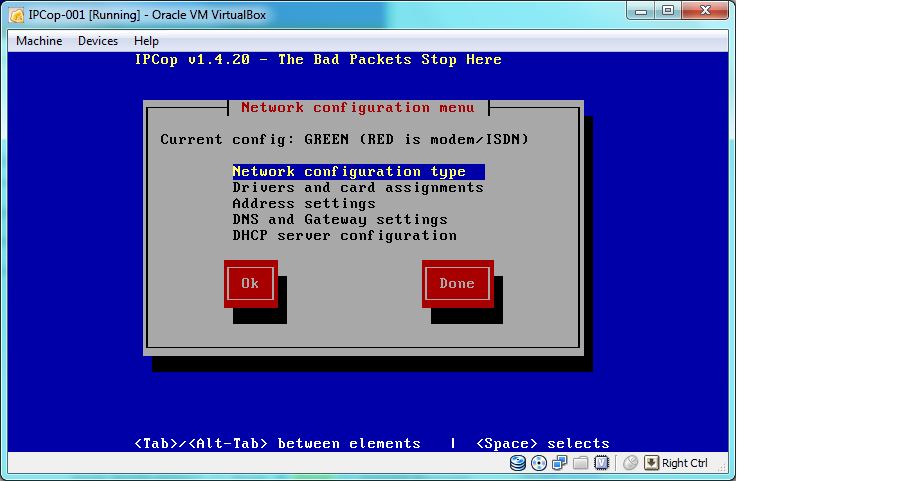
Select “Network and Configuration Type” and pick “GREEN + RED”:

And hit “OK”
- next select “Drivers and Card Assignments” and select “OK” in that window. It will ask if you want to Probe again, so select “Probe.” this should result:

- Select “OK” and go to the “DHCP Server Configuration” and enter these settings if you’re following this guide to the letter, or the proper settings if you’re an advanced user: Enabled = Checked Start Address = 192.168.0.100 End Address = 192.168.0.200 change secondary DNS to your ISP’s DNS, 8.8.8.8, or 4.2.2.2 depending on which is fastest for you. leave every other setting intact:

And select “OK”
-
Go into the “Address Settings” window, and select the RED interface, and set it to “DHCP” or “PPPOE” or “PPTP”; only the latter needs any settings for now. Your ISP should tell you what settings you need. Most consumer DSL/Cable should work on DHCP, some require PPPOE. Select “OK” and then select “Done”; and “Done” again. if it complains, just review your settings and make sure they’re sane.
-
you should be at a login: prompt after a reboot. If you’re very lucky, you’re finished. Go to a web browser, and type in 192.168.0.1:81 (exactly like that, if you used the address i gave you earlier for ipcop). It should ask you to verify a certificate, go ahead and hit OK. You should now be looking at the IPCOP web config screen. If it says “connected” and has a public IP, you’re finished. take some time to familiarize yourself with the layout and options of the ipcop web config platform. If you don’t have an IP, it means one of two things: A) you’re using PPPoE, or B) you need to reset your cable modem/dsl, plug it back in, and hit “connect” and wait a spell. If A) sounds like you, go to the Network tab, it’ll drop down three options. Pick “DIALUP” and in there, drop down the menu that has “MODEM” in it, select PPPoE, and click the refresh button to the right. Now you can enter all your gleeful PPPoE settings that your ISP gave you. username, etc. once you’re done, press SAVE. (you can set the name, i suggest doing this!) if the screen comes back grey, you’re good. if it comes back red, read the little info box at the top left and see why. usually you didn’t put in a username or something. but it will tell you.
Now, just so you know: this does set up DHCP on your network, so if you have any other devices that do that (all routers) make sure you disable that option in the router or else you’ll have machines get vry vry confused. The second thing is, the green interface on your machine probably won’t ever be able to lease a DHCP address from itself, that’s why we set it by hand. Don’t skip that step!
Addendum:
1) Why do this on a virtual machine, rather than with a spare machine? Well, sometimes you want a bit less heat and more freedom and speed. “on the metal” is a great solution for a spare 500mhz machine you have laying around the house for you and your family, but start trying to convince a small business or corporation to use an old Dell Desktop as a server, and you may run in to some problems. The total cost of this is the cost of a decent server NIC to any machine that only has 1, so the cost/benefit analysis is always in your favor.
2) I have a weird network/want to use orange network/want a wireless access point connected to this! before asking in this thread, ensure you have the proper amount of network cards. if you want the orange network to be other hosted virtual machines on the same host as your firewall, you can use “internal network” networking, and ipcop will gladly hand out IPs to other virtual machines. just enable adapter 3 and select “internal network”:

And do the same for adapter 1 on your orange virtual machines’ settings as well. Note, this only works for ORANGE, Virtual Guest Operating Systems only! you have to decide if you want all virtual machines on your orange network, otherwise you will need to invest in a third NIC, and bind that to adapter three as a bridged network as the ORANGE interface in IPCop, and a fourth NIC to bring that network back in if you want a mix of virtual and physical machines on the orange network. Blue will ALWAYS require a physical NIC. I will eventually do a writeup of how to turn a virtual machine into a custom router, including USB wifi access point (usb is the only way to bring wifi into a virtual machine. it is a headache to attempt any other way to do this)
3) How do I set up firewall brand X on this? This guide should get you 80% of the way to a complete install. the main thing this guide tells you how to do is set up the virtual machine to take over the WAN port on the host, and how to set the virtual machine up to take full advantage of your hardware. Because of this, it should be the EXACT same as setting up ANY firewall distro that relies on x86 or x86_64 hardware to run - literally.
4) Why IPCop? I’ve been using IPCop for a very long time, and it is probably the easiest to use and set up. There are hacks/mods that you can add to it to proxy flash content, offload windows updates to the proxy so only one download of each update ever hits your WAN port (the time/bandwidth savings are linear over how many machines want updates - this is perfect for a small network that doesn’t have Active Directory hosting the windows updates), it supports fine precision pinholing on the web page, as well as blocks of ports (just throw it a range, like 3500-3550 UDP), is easy to use with servers, and uses NO resources. with PAE and paging on the virtualmachine the VM software itself uses more resources than IPCop in a typical installation. If you want another solid recommendation for a software firewall, i recommend SmoothWall (what IPCop was forked from many years ago) - but their support forums are incredibly condescending to VM users, beware. My personal favorite is currently pfSense, if you have the time to set it up. It’s basically an enterprise solution, and can set up VPNs in 4 different formats, you can link them together to form a redundant network infrastructure, tons of features. My only complaint is the bandwidth graphs aren’t that great, and the addon monitoring scripts tend to crash, but they’re minor complaints.
5) How do you use it, personally? I run a 128MB RAM 16 gig HDD fixed size virtual drive, with pfSense. The host machine is a quadcore AMD with 4 gigs of ram and 3 gigabit network cards, i use GREEN + RED settings (it’s called em1 and em0 on pfSense) - the third gigabit is unused for now, it was going to be a blue network but i found a better solution. The host machine also runs a distcc gentoo build, using 4 cores, an ubuntu install, and a few testbed OSes occasionally. It is running windows XP Profession 64bit as the HOST OS, because i had a key laying around, and it’s as stable as server 2003 without the long long reboot cycles. to date, neither the host OS nor the pfSense guest OS has ever crashed. I used to run this on an ubuntu server, using virtualbox, but i was annoyed at the fileservers available, so i use the HOST OS as a fileserver, as well, for my network. Power consumption and heat are minimal due to the “cool and quiet” mode of AMD’s chipsets, and the virtual machines that use less than 4 cores leave heaps of power available for any other software i may need to run on the host. Essentially, i run 4 servers inside one box, and they all think they’re alone “on the metal” somewhere.
I’ll update this post as well as correct any errors in the original post. Thanks for reading, it took me 5 hours from start to finish to write, so there is bound to be errors and bugs in my suggestions or numbers.
have fun with FOSS firewalls! they’re a blast!